Table of Contents
- Overview
- Theory of JPEG Repair
- JPEG structure
- How to fix broken JPEG file
- Working with the Program
- Main menu
- Virtual folder tree
- Files panel
- Preview panel
- Cluster view
- Hex view
- Repairing JPEG image
- Opening JPEG file
- Repair window
- Menu commands
- Repair procedure
- Visual analysis and localization of damaged MCUs
- Finding the next correct MCU
- Deleting damaged MCUs
- Inserting empty MCUs
- Color correction
- Automatic color correction
- Manual color correction
- Filling empty MCUs with data
- Use the thumbnail image to fill the empty MCUs
- Auto-generate missing content
- Saving repaired JPEG image
- Repairing fragmented JPEG file
- Repairing damaged JPEG image based on SOS marker
- Repairing JPEG file encoded by ransomware
|
Repair window
To bring up the Repair window, use the Image > Repair main menu command.
The Repair window looks as follows:
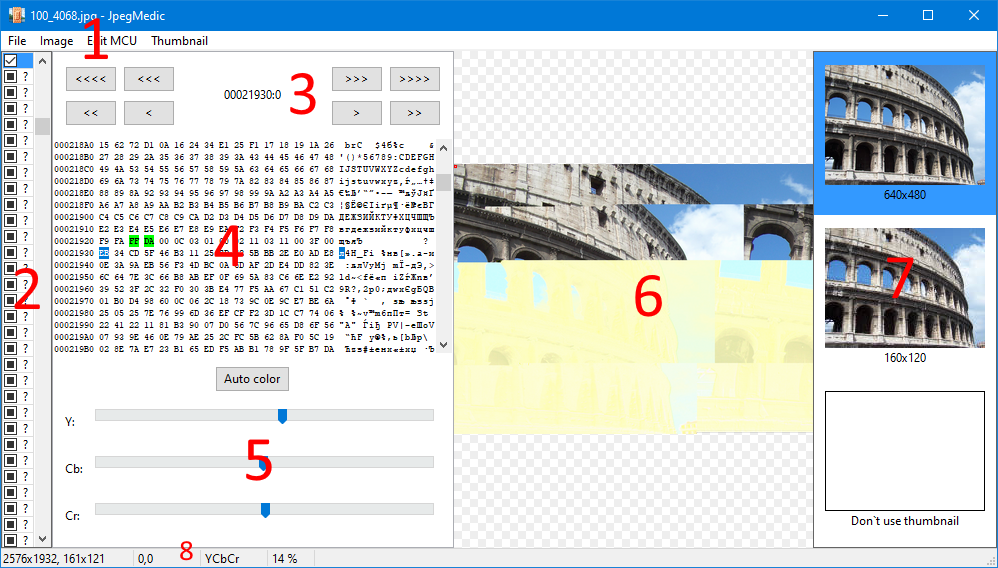
The window consists of the follow areas:
- Menu
Contains editing commands and repair tools.
- Cluster list
This area is similar to the cluster view in the main window. The list of clusters is filled automatically when you open a disk image or an individual JPEG file. The list of clusters can be used to recover a consistent JPEG file that became fragmented while saving to the storage. Normally, fragmented files open without problems, because the file system provides all the necessary information about what cluster each part of the file occupies. But if the file system is damaged, the recovery of this information is not possible anymore, and the fragmentation becomes a real issue.
- Current MCU offset selection
This part of the Repair window allows you to adjust the offset of the current MCU. The current offset is displayed as AAAAAAAA:B, where AAAAAAAA is the offset in bytes from the beginning of the JPEG bit stream, and B is the offset in bits within the current byte.
- Hex dump
This area displays the hex dump of the current JPEG stream and also the first byte of the MCU being edited.
- Color correction
This area allows you to correct DC coefficients of the current MCUs. The Auto color button allows you to adjust colors automatically.
- Image preview
Displays the image being repaired. The preview area contains the cursor. This cursor indicates the selected MCU. You can select a specific MCU with mouse or arrow key on your keyboard. Home and End buttons move the cursor to the beginning and the end of a line, respectively. Pressing Ctrl+Home and Ctrl+End moves the cursor to the beginning and the end of the current continuous block, respectively.
For more convenient editing and viewing the image, you can use the Image > Zoom menu command.
Use Image > Show grid to display or hide the MCU grid.
The Image > Show borderline command triggers display of the border indicating the real size of the image. This option is useful when you need to estimate the real dimensions of the image, if the decoding data are damaged or only the upper part of the image is visible.
The Image > Show thumbnail menu command triggers display of the selected thumbnail in place of empty blocks.
- Thumbnail list
Displays the preview of the final image, and also allows you to select a thumbnail image to fill empty MCUs.
- Status panel
The status panel displays information about the image, left to right:
- Image dimensions in pixels
- Image dimensions in MCU
- Currently selected MCU
-
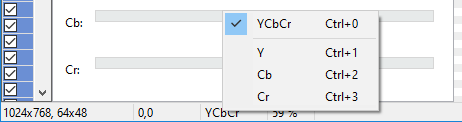
Color space of the image. You can right-click this area to bring up the menu, where you can select the color channel to display in the Image preview area as a grayscale image.
-
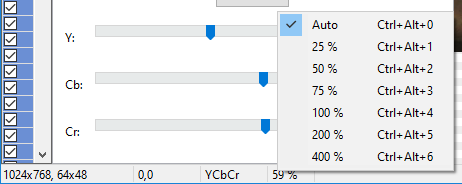
Zoom level of the image in the Image preview area, in percents. You can right-click this area to bring up the menu where you can choose the desired zoom level.
|